> ## Documentation Index
> Fetch the complete documentation index at: https://docs-dev-chore-actions-triggers-autoupdate.mintlify.site/llms.txt
> Use this file to discover all available pages before exploring further.

> Découvrez comment configurer des étapes d’inscription supplémentaires à l’aide de Forms for Actions

# Cas d’utilisation : Configurer des étapes d’inscription supplémentaires à l’aide de Forms

<Card title="Avant de commencer">
  1. Créez une [Machine-to-Machine Application](/docs/fr-ca/get-started/auth0-overview/create-applications/machine-to-machine-apps) avec les scopes suivants activés :

  * `read:users`
  * `update:users`
  * `create:users`
  * `read:users_app_metadata`
  * `update:users_app_metadata`
  * `create:users_app_metadata`

  2. Ajoutez une [connexion Vault](/docs/fr-ca/customize/forms/vault) à l’aide des informations d’identification de l’application M2M.
</Card>

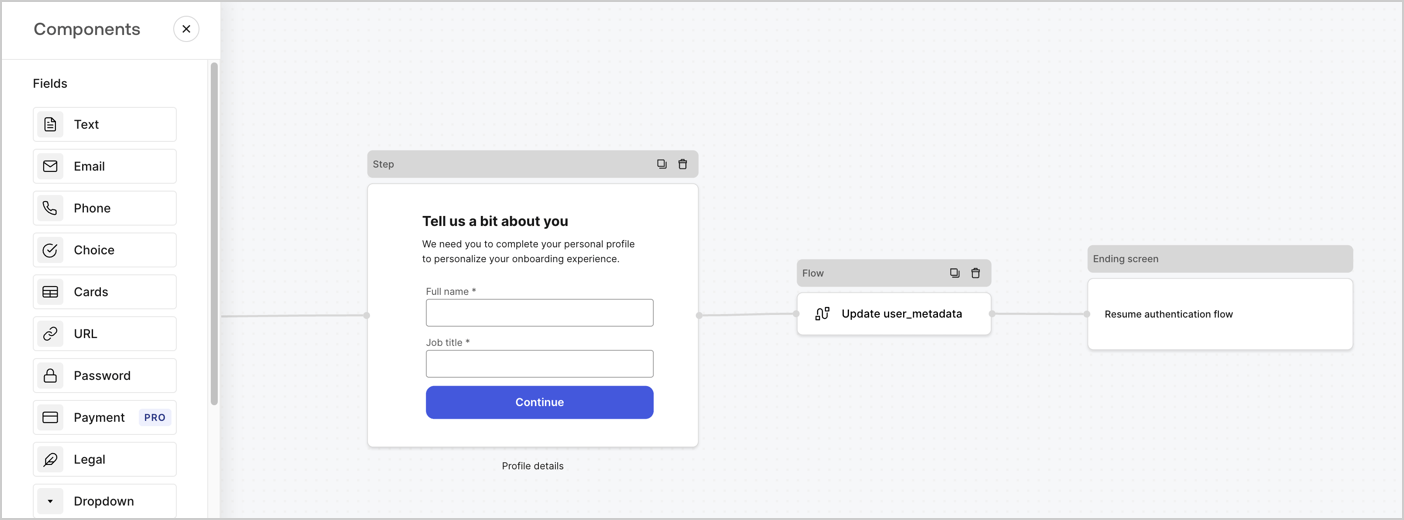
Forms for Actions vous permet d’ajouter des étapes supplémentaires à vos flux d’inscription ou de login, et de les rendre obligatoires avant que les utilisateurs puissent accéder à votre application.
<Frame>
  <img src="https://mintcdn.com/docs-dev-chore-actions-triggers-autoupdate/4KW-DBEvM2XKlxK-/docs/images/cdy7uua7fh8z/ZOQNi6SrEC9OREcBbdiJ3/d79f84fb61acd5473bdf932527e26d58/custom-signup-form.png?fit=max&auto=format&n=4KW-DBEvM2XKlxK-&q=85&s=0348f0e4191157aaf69e297e8819deb0" alt="Dashboard > Actions > Forms > Cas d’utilisation Formulaire d’inscription personnalisé" data-og-width="1404" width="1404" data-og-height="520" height="520" data-path="docs/images/cdy7uua7fh8z/ZOQNi6SrEC9OREcBbdiJ3/d79f84fb61acd5473bdf932527e26d58/custom-signup-form.png" data-optimize="true" data-opv="3" srcset="https://mintcdn.com/docs-dev-chore-actions-triggers-autoupdate/4KW-DBEvM2XKlxK-/docs/images/cdy7uua7fh8z/ZOQNi6SrEC9OREcBbdiJ3/d79f84fb61acd5473bdf932527e26d58/custom-signup-form.png?w=280&fit=max&auto=format&n=4KW-DBEvM2XKlxK-&q=85&s=79b6c65fd731a10385dd07d1fdd6e8de 280w, https://mintcdn.com/docs-dev-chore-actions-triggers-autoupdate/4KW-DBEvM2XKlxK-/docs/images/cdy7uua7fh8z/ZOQNi6SrEC9OREcBbdiJ3/d79f84fb61acd5473bdf932527e26d58/custom-signup-form.png?w=560&fit=max&auto=format&n=4KW-DBEvM2XKlxK-&q=85&s=4af91233456562eaeac8a2afc0c5e4b2 560w, https://mintcdn.com/docs-dev-chore-actions-triggers-autoupdate/4KW-DBEvM2XKlxK-/docs/images/cdy7uua7fh8z/ZOQNi6SrEC9OREcBbdiJ3/d79f84fb61acd5473bdf932527e26d58/custom-signup-form.png?w=840&fit=max&auto=format&n=4KW-DBEvM2XKlxK-&q=85&s=2525c3df02708a413c1025cdf1948492 840w, https://mintcdn.com/docs-dev-chore-actions-triggers-autoupdate/4KW-DBEvM2XKlxK-/docs/images/cdy7uua7fh8z/ZOQNi6SrEC9OREcBbdiJ3/d79f84fb61acd5473bdf932527e26d58/custom-signup-form.png?w=1100&fit=max&auto=format&n=4KW-DBEvM2XKlxK-&q=85&s=1b9f6c6b3c53fb8f0d60c5eb89361a8e 1100w, https://mintcdn.com/docs-dev-chore-actions-triggers-autoupdate/4KW-DBEvM2XKlxK-/docs/images/cdy7uua7fh8z/ZOQNi6SrEC9OREcBbdiJ3/d79f84fb61acd5473bdf932527e26d58/custom-signup-form.png?w=1650&fit=max&auto=format&n=4KW-DBEvM2XKlxK-&q=85&s=b54af16564b719884434e01baa03f2f6 1650w, https://mintcdn.com/docs-dev-chore-actions-triggers-autoupdate/4KW-DBEvM2XKlxK-/docs/images/cdy7uua7fh8z/ZOQNi6SrEC9OREcBbdiJ3/d79f84fb61acd5473bdf932527e26d58/custom-signup-form.png?w=2500&fit=max&auto=format&n=4KW-DBEvM2XKlxK-&q=85&s=242fdcbffc910f45429d23bcb6a2f59d 2500w" />
</Frame>

Les sections ci-dessous expliquent comment créer des formulaires pour ajouter des étapes d’inscription supplémentaires à l’aide de nœuds et de flux, ainsi que la marche à suivre pour ajouter votre formulaire à une Action [Post Login](/docs/fr-ca/customize/actions/explore-triggers/signup-and-login-triggers/login-trigger).

<h2 id="create-a-form-from-scratch">
  Créer un formulaire à partir de zéro
</h2>

Suivez ces étapes pour créer un formulaire afin de recueillir des renseignements :

1. Ouvrez l’éditeur de formulaires en sélectionnant **Auth0 Dashboard > Actions > Forms.**
2. Sélectionnez **Create Form** > **Start from scratch**.

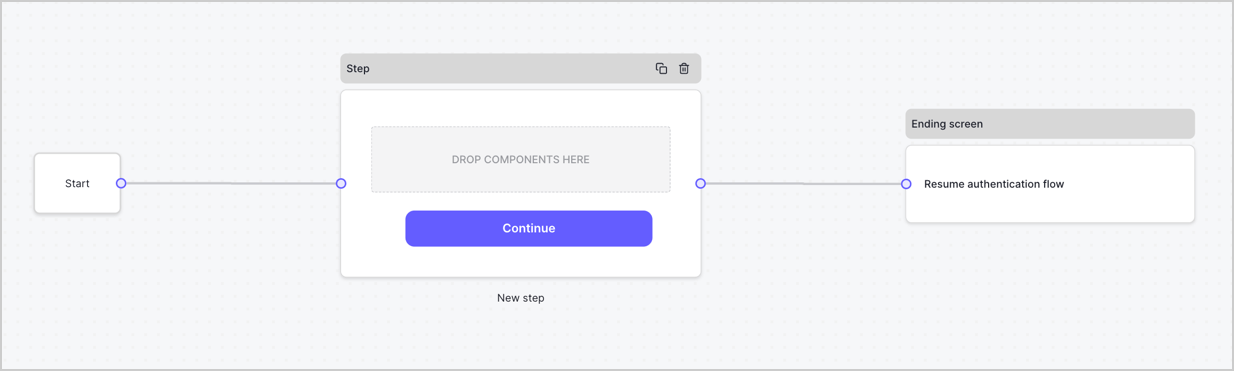
Par défaut, un nouveau formulaire contient un nœud Start, un nœud Step et un nœud Ending screen.
<Frame>
  <img src="https://mintcdn.com/docs-dev-chore-actions-triggers-autoupdate/khsGGGmvn88p2r99/docs/images/cdy7uua7fh8z/2TZ9jSjgEcARFpULI6hz4R/a4319a1bd482f2ee5cc23100fdb2f42c/New-form-Forms-for-action-use-case.png?fit=max&auto=format&n=khsGGGmvn88p2r99&q=85&s=f1dbf58e4566a5357d594dcaf959bd81" alt="Dashboard > Forms > Cas d’utilisation > Form" data-og-width="1234" width="1234" data-og-height="371" height="371" data-path="docs/images/cdy7uua7fh8z/2TZ9jSjgEcARFpULI6hz4R/a4319a1bd482f2ee5cc23100fdb2f42c/New-form-Forms-for-action-use-case.png" data-optimize="true" data-opv="3" srcset="https://mintcdn.com/docs-dev-chore-actions-triggers-autoupdate/khsGGGmvn88p2r99/docs/images/cdy7uua7fh8z/2TZ9jSjgEcARFpULI6hz4R/a4319a1bd482f2ee5cc23100fdb2f42c/New-form-Forms-for-action-use-case.png?w=280&fit=max&auto=format&n=khsGGGmvn88p2r99&q=85&s=4d90bdcaf4dcc6e9387e45af26cf5d3a 280w, https://mintcdn.com/docs-dev-chore-actions-triggers-autoupdate/khsGGGmvn88p2r99/docs/images/cdy7uua7fh8z/2TZ9jSjgEcARFpULI6hz4R/a4319a1bd482f2ee5cc23100fdb2f42c/New-form-Forms-for-action-use-case.png?w=560&fit=max&auto=format&n=khsGGGmvn88p2r99&q=85&s=6cb05b196f2fac0ea170614da0e7a363 560w, https://mintcdn.com/docs-dev-chore-actions-triggers-autoupdate/khsGGGmvn88p2r99/docs/images/cdy7uua7fh8z/2TZ9jSjgEcARFpULI6hz4R/a4319a1bd482f2ee5cc23100fdb2f42c/New-form-Forms-for-action-use-case.png?w=840&fit=max&auto=format&n=khsGGGmvn88p2r99&q=85&s=6cdc16bf26629ecfecbec7b9e9941fa3 840w, https://mintcdn.com/docs-dev-chore-actions-triggers-autoupdate/khsGGGmvn88p2r99/docs/images/cdy7uua7fh8z/2TZ9jSjgEcARFpULI6hz4R/a4319a1bd482f2ee5cc23100fdb2f42c/New-form-Forms-for-action-use-case.png?w=1100&fit=max&auto=format&n=khsGGGmvn88p2r99&q=85&s=87d1315d87789acd3eac975e111504eb 1100w, https://mintcdn.com/docs-dev-chore-actions-triggers-autoupdate/khsGGGmvn88p2r99/docs/images/cdy7uua7fh8z/2TZ9jSjgEcARFpULI6hz4R/a4319a1bd482f2ee5cc23100fdb2f42c/New-form-Forms-for-action-use-case.png?w=1650&fit=max&auto=format&n=khsGGGmvn88p2r99&q=85&s=f933b4a6086fa8588140adbd3e9393cb 1650w, https://mintcdn.com/docs-dev-chore-actions-triggers-autoupdate/khsGGGmvn88p2r99/docs/images/cdy7uua7fh8z/2TZ9jSjgEcARFpULI6hz4R/a4319a1bd482f2ee5cc23100fdb2f42c/New-form-Forms-for-action-use-case.png?w=2500&fit=max&auto=format&n=khsGGGmvn88p2r99&q=85&s=39a6cae92f72c55d09bd854a11133255 2500w" />
</Frame>

<h3 id="configure-the-step-node">
  Configurer le nœud Step
</h3>

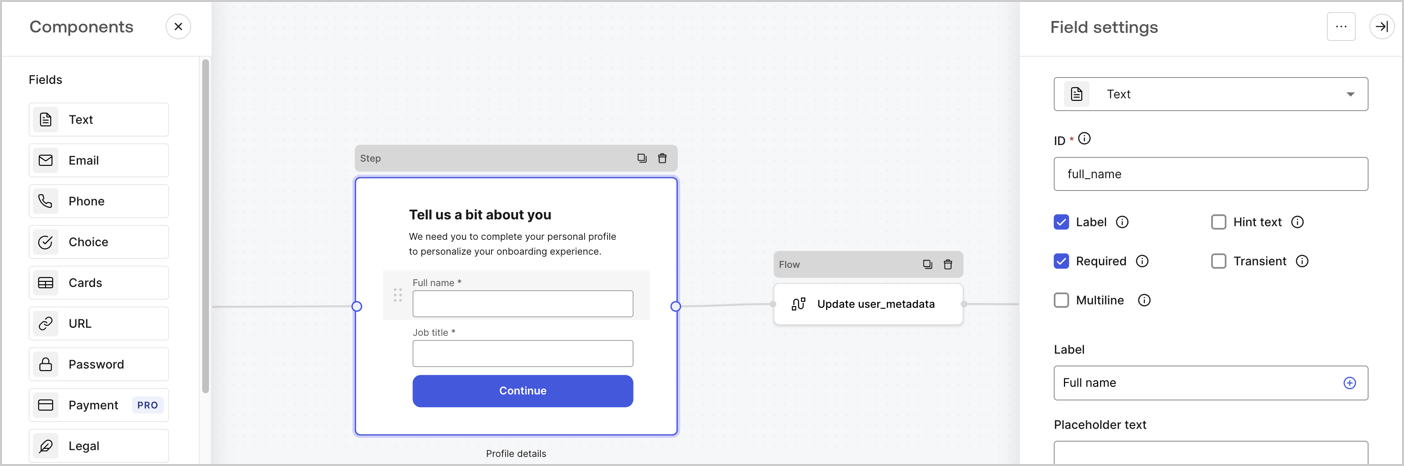
Le nœud Step est l’interface graphique visible par les utilisateurs. Ajoutez des [champs](/docs/fr-ca/customize/forms/nodes-and-components) au nœud Step pour recueillir le nom complet et le titre du poste de l’utilisateur en suivant ces étapes :

1. Faites glisser un champ **Texte enrichi** du **menu Components** vers le nœud **Step**.

   * **Texte enrichi** : Saisissez un message personnalisé.
   * Sélectionnez **Enregistrer**.
2. Faites glisser un champ **Texte** vers le nœud **Step**.

   * **ID** : Saisissez `full_name`.
   * **Étiquette** : Saisissez `Full name`.
   * **Étiquette** : Cochez la case.
   * **Obligatoire** : Cochez la case.
   * Sélectionnez **Enregistrer**.
3. Faites glisser un champ **Texte** vers le nœud **Step**.

   * **ID** : Saisissez `job_title`.
   * **Étiquette** : Saisissez `Job title.`
   * **Étiquette** : Cochez la case.
   * **Obligatoire** : Cochez la case.
   * Sélectionnez **Enregistrer**.
4. Sélectionnez **Publier** pour enregistrer.
<Frame>
  <img src="https://mintcdn.com/docs-dev-chore-actions-triggers-autoupdate/JeCjEaTFYoe6VDKn/docs/images/cdy7uua7fh8z/6Kcn0ai9fsVsqHwZpTGByG/37cbf4ffee63a7010926b15f06dd20ac/custom-signup-step-node.png?fit=max&auto=format&n=JeCjEaTFYoe6VDKn&q=85&s=8e9e6bdb78a3f2e8a89898b52d1a0ef8" alt="Dashboard > Actions > Forms > cas d’utilisation Custom Signup étapes nœud Step" data-og-width="1404" width="1404" data-og-height="466" height="466" data-path="docs/images/cdy7uua7fh8z/6Kcn0ai9fsVsqHwZpTGByG/37cbf4ffee63a7010926b15f06dd20ac/custom-signup-step-node.png" data-optimize="true" data-opv="3" srcset="https://mintcdn.com/docs-dev-chore-actions-triggers-autoupdate/JeCjEaTFYoe6VDKn/docs/images/cdy7uua7fh8z/6Kcn0ai9fsVsqHwZpTGByG/37cbf4ffee63a7010926b15f06dd20ac/custom-signup-step-node.png?w=280&fit=max&auto=format&n=JeCjEaTFYoe6VDKn&q=85&s=49c72819a01fa43e7786e61bfe89a00d 280w, https://mintcdn.com/docs-dev-chore-actions-triggers-autoupdate/JeCjEaTFYoe6VDKn/docs/images/cdy7uua7fh8z/6Kcn0ai9fsVsqHwZpTGByG/37cbf4ffee63a7010926b15f06dd20ac/custom-signup-step-node.png?w=560&fit=max&auto=format&n=JeCjEaTFYoe6VDKn&q=85&s=13dbc415671032eeb5b1134d0bf451c5 560w, https://mintcdn.com/docs-dev-chore-actions-triggers-autoupdate/JeCjEaTFYoe6VDKn/docs/images/cdy7uua7fh8z/6Kcn0ai9fsVsqHwZpTGByG/37cbf4ffee63a7010926b15f06dd20ac/custom-signup-step-node.png?w=840&fit=max&auto=format&n=JeCjEaTFYoe6VDKn&q=85&s=c48f0fb613329251858c91a9494beaa1 840w, https://mintcdn.com/docs-dev-chore-actions-triggers-autoupdate/JeCjEaTFYoe6VDKn/docs/images/cdy7uua7fh8z/6Kcn0ai9fsVsqHwZpTGByG/37cbf4ffee63a7010926b15f06dd20ac/custom-signup-step-node.png?w=1100&fit=max&auto=format&n=JeCjEaTFYoe6VDKn&q=85&s=fa2070e0a5e4eee9c2253a4e6484495a 1100w, https://mintcdn.com/docs-dev-chore-actions-triggers-autoupdate/JeCjEaTFYoe6VDKn/docs/images/cdy7uua7fh8z/6Kcn0ai9fsVsqHwZpTGByG/37cbf4ffee63a7010926b15f06dd20ac/custom-signup-step-node.png?w=1650&fit=max&auto=format&n=JeCjEaTFYoe6VDKn&q=85&s=9cdc86d5d271b17f4dcf334495c30d96 1650w, https://mintcdn.com/docs-dev-chore-actions-triggers-autoupdate/JeCjEaTFYoe6VDKn/docs/images/cdy7uua7fh8z/6Kcn0ai9fsVsqHwZpTGByG/37cbf4ffee63a7010926b15f06dd20ac/custom-signup-step-node.png?w=2500&fit=max&auto=format&n=JeCjEaTFYoe6VDKn&q=85&s=6e1d7af2e2389ec6a79b39ed2d9c88f4 2500w" />
</Frame>

<h3 id="configure-the-flow-node">
  Configurer le nœud Flow
</h3>

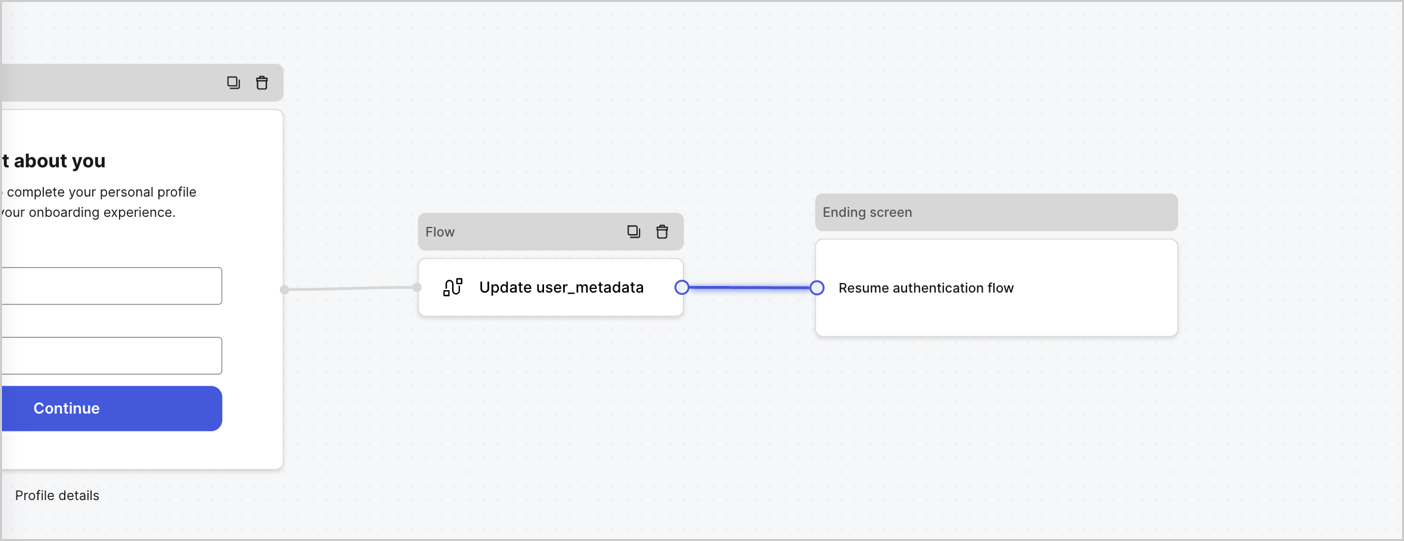
Ajoutez un nœud **Flow** après le nœud **Step** pour mettre à jour `user_metadata` et reprendre le flux d’authentification en suivant ces étapes :

1. Sélectionnez **Flow** au bas de l’éditeur de formulaires.
2. Supprimez le lien existant entre les nœuds **Step** et **Ending Screen**.
3. Sélectionnez le nouveau **Flow** > **Click to add a flow** > **Create a new flow.**

   * Entrez `Update user_metadata` dans le champ **Name**.
   * Sélectionnez **Create**.
   * Sélectionnez **Save**.
4. Liez le nœud **Flow** aux nœuds **Step** et **Ending Screen**, comme illustré ci-dessous.
5. Sélectionnez **Publish** pour enregistrer.
<Frame>
  <img src="https://mintcdn.com/docs-dev-chore-actions-triggers-autoupdate/R5ivmkXd2l4BLNhc/docs/images/cdy7uua7fh8z/4nTdYdA2Hu5vK65smkdvJg/db3294ebc25a7c2636be96362a3ea56e/custom-signup-step-flow.png?fit=max&auto=format&n=R5ivmkXd2l4BLNhc&q=85&s=6474bd9f7dc47e2a18fac711424e88a2" alt="Dashboard > Actions > Forms > Cas d’usage Custom Signup Step Update User metadata flow" data-og-width="1404" width="1404" data-og-height="541" height="541" data-path="docs/images/cdy7uua7fh8z/4nTdYdA2Hu5vK65smkdvJg/db3294ebc25a7c2636be96362a3ea56e/custom-signup-step-flow.png" data-optimize="true" data-opv="3" srcset="https://mintcdn.com/docs-dev-chore-actions-triggers-autoupdate/R5ivmkXd2l4BLNhc/docs/images/cdy7uua7fh8z/4nTdYdA2Hu5vK65smkdvJg/db3294ebc25a7c2636be96362a3ea56e/custom-signup-step-flow.png?w=280&fit=max&auto=format&n=R5ivmkXd2l4BLNhc&q=85&s=876d2b5e61895d210c40db692ea4d7d2 280w, https://mintcdn.com/docs-dev-chore-actions-triggers-autoupdate/R5ivmkXd2l4BLNhc/docs/images/cdy7uua7fh8z/4nTdYdA2Hu5vK65smkdvJg/db3294ebc25a7c2636be96362a3ea56e/custom-signup-step-flow.png?w=560&fit=max&auto=format&n=R5ivmkXd2l4BLNhc&q=85&s=a2e0960da07430ce1261bfd61a0264cb 560w, https://mintcdn.com/docs-dev-chore-actions-triggers-autoupdate/R5ivmkXd2l4BLNhc/docs/images/cdy7uua7fh8z/4nTdYdA2Hu5vK65smkdvJg/db3294ebc25a7c2636be96362a3ea56e/custom-signup-step-flow.png?w=840&fit=max&auto=format&n=R5ivmkXd2l4BLNhc&q=85&s=4365e916afa712fac6cea6a877654a0f 840w, https://mintcdn.com/docs-dev-chore-actions-triggers-autoupdate/R5ivmkXd2l4BLNhc/docs/images/cdy7uua7fh8z/4nTdYdA2Hu5vK65smkdvJg/db3294ebc25a7c2636be96362a3ea56e/custom-signup-step-flow.png?w=1100&fit=max&auto=format&n=R5ivmkXd2l4BLNhc&q=85&s=02e22a0126cc90864cf0993c6088ae7d 1100w, https://mintcdn.com/docs-dev-chore-actions-triggers-autoupdate/R5ivmkXd2l4BLNhc/docs/images/cdy7uua7fh8z/4nTdYdA2Hu5vK65smkdvJg/db3294ebc25a7c2636be96362a3ea56e/custom-signup-step-flow.png?w=1650&fit=max&auto=format&n=R5ivmkXd2l4BLNhc&q=85&s=70c87bd9db98edc2a4884b370b1a961f 1650w, https://mintcdn.com/docs-dev-chore-actions-triggers-autoupdate/R5ivmkXd2l4BLNhc/docs/images/cdy7uua7fh8z/4nTdYdA2Hu5vK65smkdvJg/db3294ebc25a7c2636be96362a3ea56e/custom-signup-step-flow.png?w=2500&fit=max&auto=format&n=R5ivmkXd2l4BLNhc&q=85&s=e907aedcde9d2d7d8ed46f26cfcfca1b 2500w" />
</Frame>

Ajoutez une action Auth0 **Update user** au flux en suivant ces étapes :

1. Sélectionnez le **Flow** **Update user\_metadata** > **Edit flow** pour ouvrir l’éditeur de flux dans un nouvel onglet.
2. Sous StartAction, sélectionnez l’icône **+** pour ajouter une Action **Update user**. Remplissez les champs ci-dessous, puis sélectionnez **Save** pour continuer.

   * **Connection** : Dans la liste déroulante, sélectionnez la connexion Vault vers votre application M2M.

   * **User ID** : Entrez `{{context.user.user_id}}`.

   * **Body** : Copiez-collez le code suivant pour mettre à jour `user_metadata` avec les propriétés `full_name` et `job_title`.

     ```json lines theme={null}
     {
       "user_metadata": {
         "full_name": "{{fields.full_name}}",
         "job_title": "{{fields.job_title}}"
       }
     }
     ```

   * Sélectionnez **Save**.
3. Sélectionnez Publish pour enregistrer.

<h2 id="retrieve-your-form-render-code">
  Récupérez le code de rendu de votre formulaire
</h2>

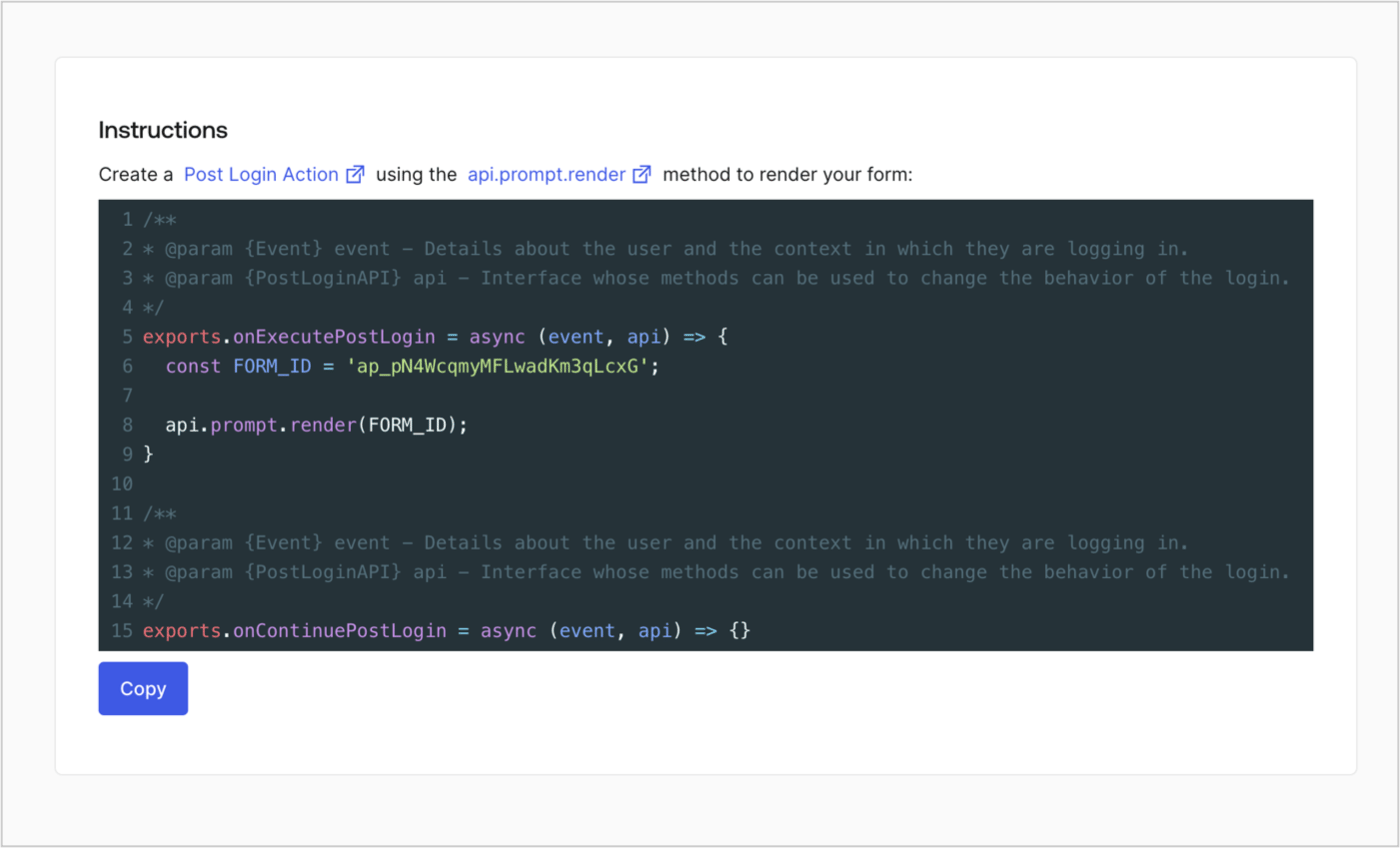
Récupérez le code de rendu de votre formulaire pour afficher le formulaire visuellement à l’aide d’une Action Post Login personnalisée en suivant ces étapes :

* Dans l’éditeur de formulaires, sélectionnez **`<> Render`**.
* Sélectionnez **Copy**.
<Frame>
  <img src="https://mintcdn.com/docs-dev-chore-actions-triggers-autoupdate/Bi6A9RAv5JG5Lq49/docs/images/cdy7uua7fh8z/2EIUzc539sq9lwoTKbjoJv/496a864c0fc44a782c9cadca119dbfb0/embed.png?fit=max&auto=format&n=Bi6A9RAv5JG5Lq49&q=85&s=3c4335e02bd284220dded4b926139d6c" alt="Dashboard > Actions > Forms > Form > Embed" data-og-width="1400" width="1400" data-og-height="848" height="848" data-path="docs/images/cdy7uua7fh8z/2EIUzc539sq9lwoTKbjoJv/496a864c0fc44a782c9cadca119dbfb0/embed.png" data-optimize="true" data-opv="3" srcset="https://mintcdn.com/docs-dev-chore-actions-triggers-autoupdate/Bi6A9RAv5JG5Lq49/docs/images/cdy7uua7fh8z/2EIUzc539sq9lwoTKbjoJv/496a864c0fc44a782c9cadca119dbfb0/embed.png?w=280&fit=max&auto=format&n=Bi6A9RAv5JG5Lq49&q=85&s=ac4eb77fb3f87cb6a1d1d22ac2746dde 280w, https://mintcdn.com/docs-dev-chore-actions-triggers-autoupdate/Bi6A9RAv5JG5Lq49/docs/images/cdy7uua7fh8z/2EIUzc539sq9lwoTKbjoJv/496a864c0fc44a782c9cadca119dbfb0/embed.png?w=560&fit=max&auto=format&n=Bi6A9RAv5JG5Lq49&q=85&s=b58280d124d56bf41ceff80a3a9b4dee 560w, https://mintcdn.com/docs-dev-chore-actions-triggers-autoupdate/Bi6A9RAv5JG5Lq49/docs/images/cdy7uua7fh8z/2EIUzc539sq9lwoTKbjoJv/496a864c0fc44a782c9cadca119dbfb0/embed.png?w=840&fit=max&auto=format&n=Bi6A9RAv5JG5Lq49&q=85&s=4802c81436ac65a14015a0ceb31e05d3 840w, https://mintcdn.com/docs-dev-chore-actions-triggers-autoupdate/Bi6A9RAv5JG5Lq49/docs/images/cdy7uua7fh8z/2EIUzc539sq9lwoTKbjoJv/496a864c0fc44a782c9cadca119dbfb0/embed.png?w=1100&fit=max&auto=format&n=Bi6A9RAv5JG5Lq49&q=85&s=df969fdaa17e2c6512fc8a4d0f0b7496 1100w, https://mintcdn.com/docs-dev-chore-actions-triggers-autoupdate/Bi6A9RAv5JG5Lq49/docs/images/cdy7uua7fh8z/2EIUzc539sq9lwoTKbjoJv/496a864c0fc44a782c9cadca119dbfb0/embed.png?w=1650&fit=max&auto=format&n=Bi6A9RAv5JG5Lq49&q=85&s=b20867730bed25b34eb175b63663dd77 1650w, https://mintcdn.com/docs-dev-chore-actions-triggers-autoupdate/Bi6A9RAv5JG5Lq49/docs/images/cdy7uua7fh8z/2EIUzc539sq9lwoTKbjoJv/496a864c0fc44a782c9cadca119dbfb0/embed.png?w=2500&fit=max&auto=format&n=Bi6A9RAv5JG5Lq49&q=85&s=da99087abad19e7d8bfda8387a68f78f 2500w" />
</Frame>

<h2 id="create-a-post-login-action">
  Créer une Action Post Login
</h2>

Créez une Action post-login pour afficher votre formulaire en suivant ces étapes :

1. Accédez à **Auth0 Dashboard > Actions > Flows > Login.**
2. Sélectionnez l’icône **+**, puis **Build from scratch** :

   * **Name** : Entrez `Render Additional Signup Form`.
   * **Trigger** : Sélectionnez `Login / Post Login`.
   * **Runtime** : Sélectionnez la version recommandée.
3. Sélectionnez **Create**.

Pour configurer l’Action post-login :

1. Supprimez le code existant dans l’éditeur de code.
2. Collez le code de rendu du formulaire dans l’éditeur de code.
3. Modifiez le code pour définir la logique conditionnelle qui affichera le formulaire.

   ```javascript lines theme={null}
   /**
   * @param {Event} event - Détails sur l’utilisateur et le contexte dans lequel il se connecte.
   * @param {PostLoginAPI} api - Interface dont les méthodes peuvent être utilisées pour modifier le comportement du processus de connexion.
   */
   exports.onExecutePostLogin = async (event, api) => {
     const FORM_ID = 'REPLACE_WITH_YOUR_FORM_ID';

     if (
       !event.user.user_metadata.full_name &&
       !event.user.user_metadata.job_title
     ) {
       api.prompt.render(FORM_ID);
     }
   }

   exports.onContinuePostLogin = async (event, api) => { }
   ```

   <Callout icon="file-lines" color="#0EA5E9" iconType="regular">
     L’exemple de code ci-dessus affichera le formulaire si les propriétés `full_name` et `job_title` sont absentes des métadonnées utilisateur.
   </Callout>
4. Sélectionnez **Deploy.**
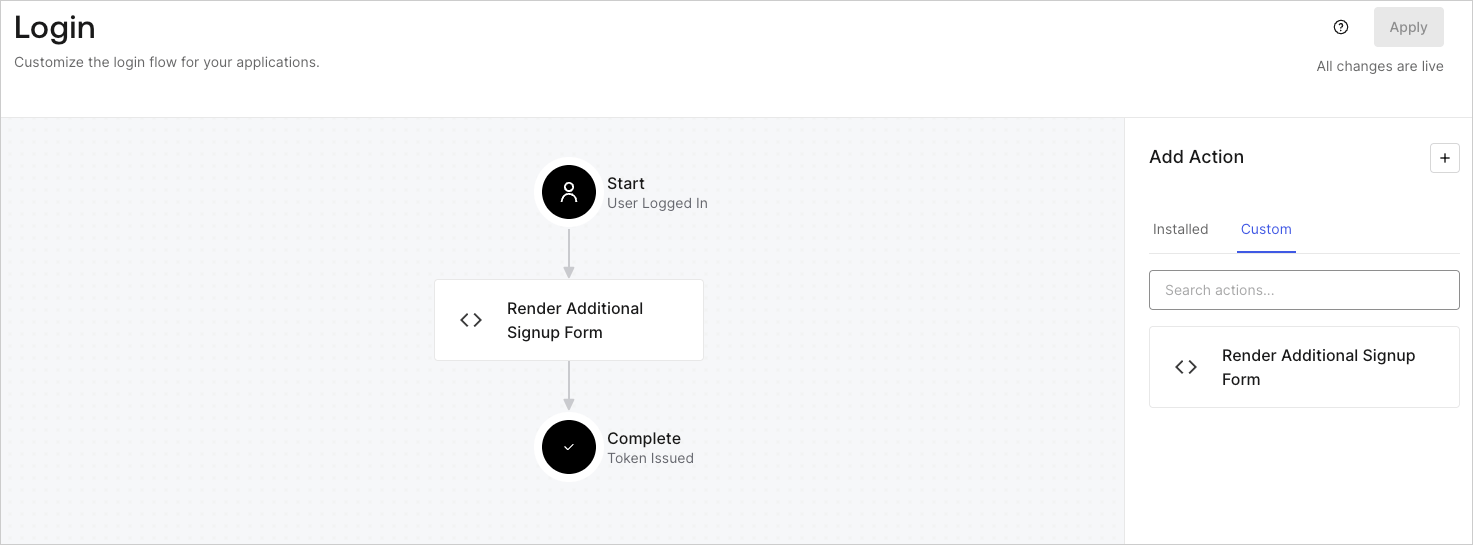
5. Glissez-déposez l’Action **Render Additional Signup Form** dans le flux **Login**.
   <Frame>
     <img src="https://mintcdn.com/docs-dev-chore-actions-triggers-autoupdate/Bi6A9RAv5JG5Lq49/docs/images/cdy7uua7fh8z/1WBOicIOcH98hKj6Lq9HF2/4951e30a0cc08c7c5daa0116eaa17e11/Screenshot_2024-03-01_at_15.48.00.png?fit=max&auto=format&n=Bi6A9RAv5JG5Lq49&q=85&s=a794850bfe160c1f3c56c47527ef0c91" alt="Dashboard > Forms > Use Cases Custom Signup Steps Login Flow" data-og-width="1473" width="1473" data-og-height="545" height="545" data-path="docs/images/cdy7uua7fh8z/1WBOicIOcH98hKj6Lq9HF2/4951e30a0cc08c7c5daa0116eaa17e11/Screenshot_2024-03-01_at_15.48.00.png" data-optimize="true" data-opv="3" srcset="https://mintcdn.com/docs-dev-chore-actions-triggers-autoupdate/Bi6A9RAv5JG5Lq49/docs/images/cdy7uua7fh8z/1WBOicIOcH98hKj6Lq9HF2/4951e30a0cc08c7c5daa0116eaa17e11/Screenshot_2024-03-01_at_15.48.00.png?w=280&fit=max&auto=format&n=Bi6A9RAv5JG5Lq49&q=85&s=9ed02e224130a48257a0d72095b577ee 280w, https://mintcdn.com/docs-dev-chore-actions-triggers-autoupdate/Bi6A9RAv5JG5Lq49/docs/images/cdy7uua7fh8z/1WBOicIOcH98hKj6Lq9HF2/4951e30a0cc08c7c5daa0116eaa17e11/Screenshot_2024-03-01_at_15.48.00.png?w=560&fit=max&auto=format&n=Bi6A9RAv5JG5Lq49&q=85&s=400c3ea7dfbf752ce70a4824acf3ceb3 560w, https://mintcdn.com/docs-dev-chore-actions-triggers-autoupdate/Bi6A9RAv5JG5Lq49/docs/images/cdy7uua7fh8z/1WBOicIOcH98hKj6Lq9HF2/4951e30a0cc08c7c5daa0116eaa17e11/Screenshot_2024-03-01_at_15.48.00.png?w=840&fit=max&auto=format&n=Bi6A9RAv5JG5Lq49&q=85&s=a39a2b753046cd6f31661f79ca205ebc 840w, https://mintcdn.com/docs-dev-chore-actions-triggers-autoupdate/Bi6A9RAv5JG5Lq49/docs/images/cdy7uua7fh8z/1WBOicIOcH98hKj6Lq9HF2/4951e30a0cc08c7c5daa0116eaa17e11/Screenshot_2024-03-01_at_15.48.00.png?w=1100&fit=max&auto=format&n=Bi6A9RAv5JG5Lq49&q=85&s=49a581b15fed87e73d451a9b31d6f68c 1100w, https://mintcdn.com/docs-dev-chore-actions-triggers-autoupdate/Bi6A9RAv5JG5Lq49/docs/images/cdy7uua7fh8z/1WBOicIOcH98hKj6Lq9HF2/4951e30a0cc08c7c5daa0116eaa17e11/Screenshot_2024-03-01_at_15.48.00.png?w=1650&fit=max&auto=format&n=Bi6A9RAv5JG5Lq49&q=85&s=fe3249ab2471907097c66ed7169a77c7 1650w, https://mintcdn.com/docs-dev-chore-actions-triggers-autoupdate/Bi6A9RAv5JG5Lq49/docs/images/cdy7uua7fh8z/1WBOicIOcH98hKj6Lq9HF2/4951e30a0cc08c7c5daa0116eaa17e11/Screenshot_2024-03-01_at_15.48.00.png?w=2500&fit=max&auto=format&n=Bi6A9RAv5JG5Lq49&q=85&s=c39c06efafb210eb99f12e3d6fcb8b6f 2500w" />
   </Frame>
6. Sélectionnez **Apply**.

<h3 id="test-implementation">
  Tester la mise en œuvre
</h3>

Testez la mise en œuvre en suivant ces étapes :

* Inscrivez un nouvel utilisateur à une application.
* L’Action post-login dans le flux de Login affichera le formulaire et demandera ces renseignements.
* Sélectionnez **<Tooltip tip="Auth0 Dashboard : l’interface principale d’Auth0 pour configurer vos services." cta="Voir le glossaire" href="/docs/fr-ca/glossary?term=Auth0+Dashboard">Auth0 Dashboard</Tooltip> > User Management > Users,** repérez le nouvel utilisateur et vérifiez que ses attributs `full_name` et `job_title` contiennent les renseignements saisis à l’étape d’inscription supplémentaire.
